IDrive® Mirror
IDrive® Mirror
Do I need to install any storage device to backup my computer to IDrive® Mirror?No. There is no requirement to install any additional / intermediary storage device to start using IDrive® Mirror. |
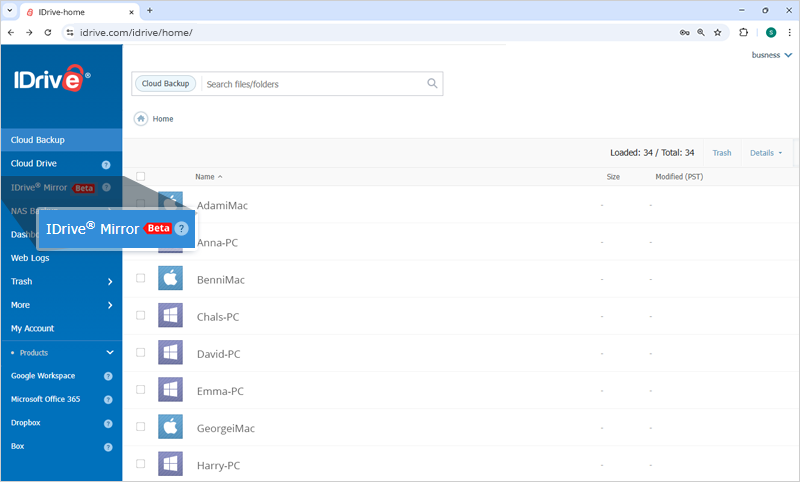
Can I sign in to IDrive® Mirror from the web?Yes. IDrive® Mirror is a web-based application. To perform backup, restore, or any other activities on your IDrive® Mirror account from anywhere. Sign in to your IDrive account and click ‘IDrive Mirror’ from the left navigation menu in any supported browser. You can also use the desktop application to perform backup and restore. |
Is it possible to restore files while a backup is in progress in IDrive® Mirror?Yes, IDrive Mirror allows you to restore files while a backup is in progress. This currently applies only to file restore, enabling you to restore files to the original location or a custom location without interrupting the backup. 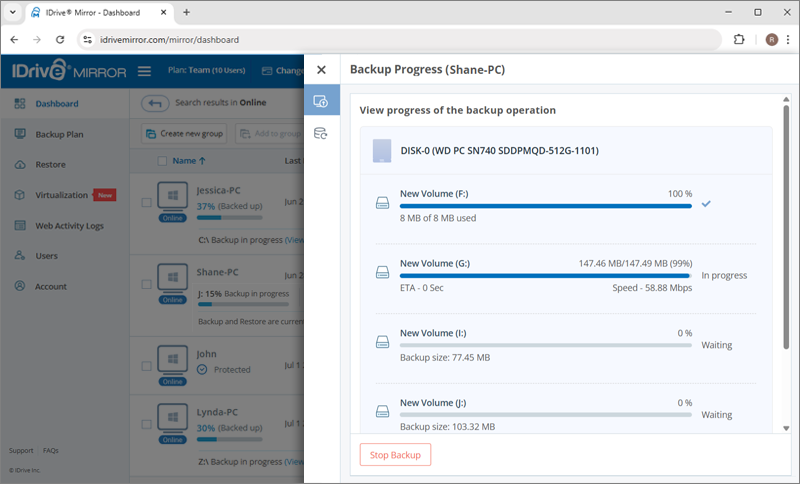 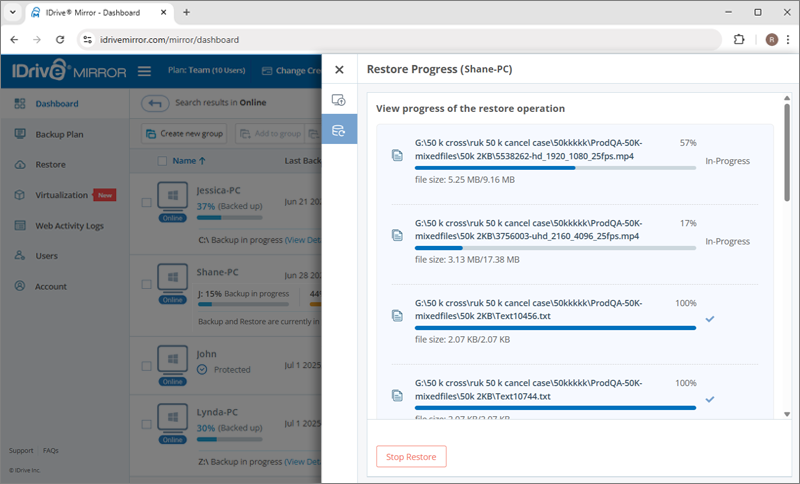 |
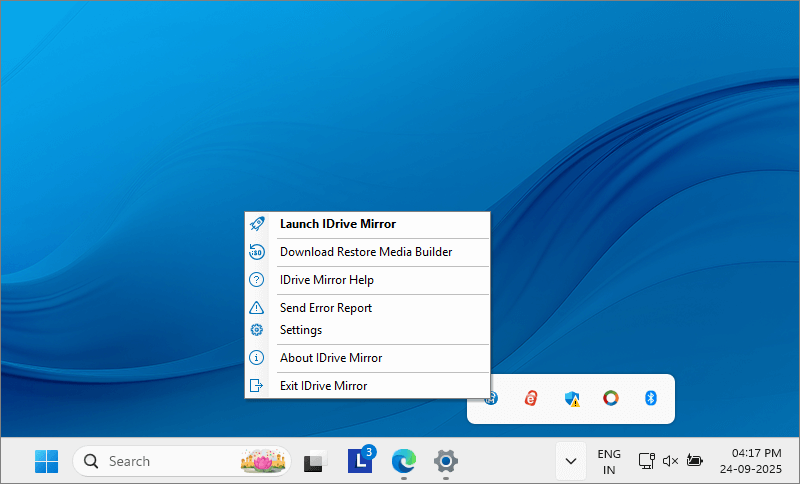
Can I access my Mirror account from the desktop tray icon?Yes, you can right click the tray icon on the computer and select 'IDrive Mirror Web Access' to open the Mirror web console. The other options available in the tray icon:
|
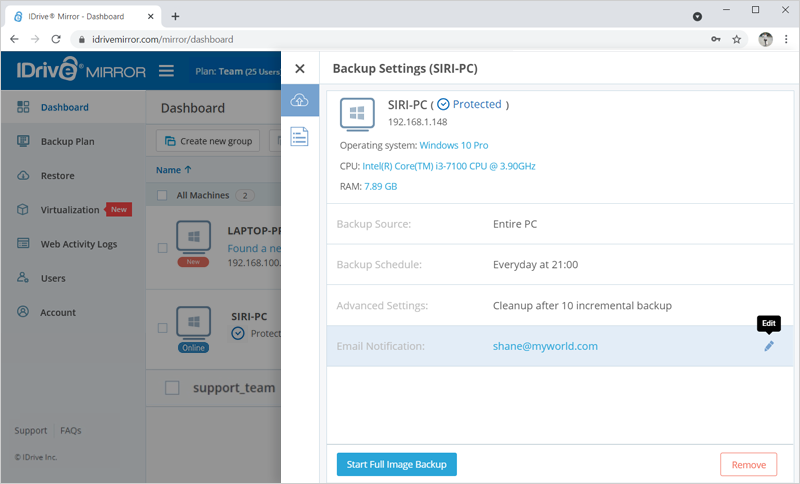
How can I receive email alerts about backup status and other activities?You will receive alerts and notifications on the email address registered with IDrive® Mirror for all the computers linked with your account. To add other recipients for receiving email alerts related to a computer,
|
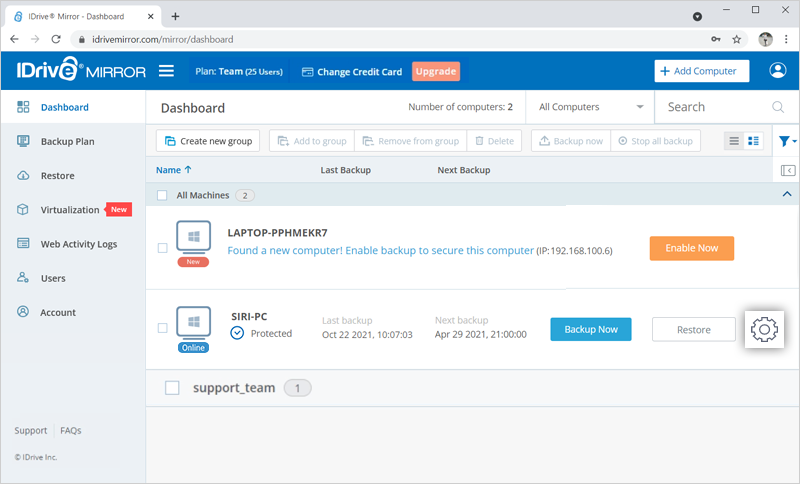
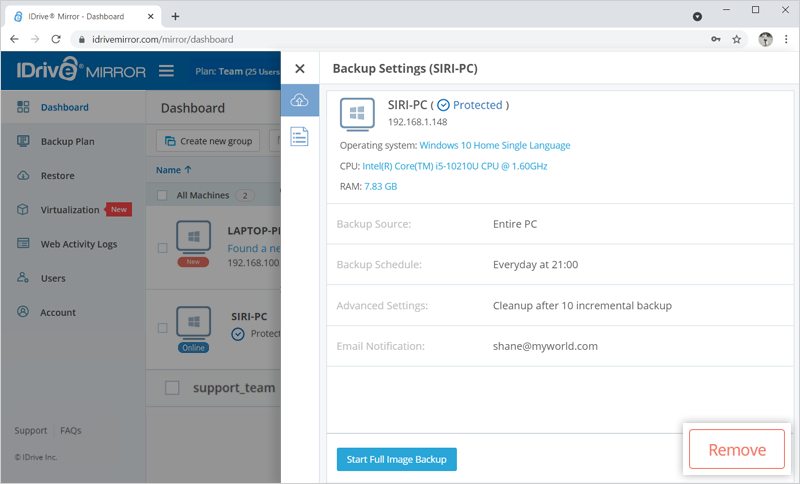
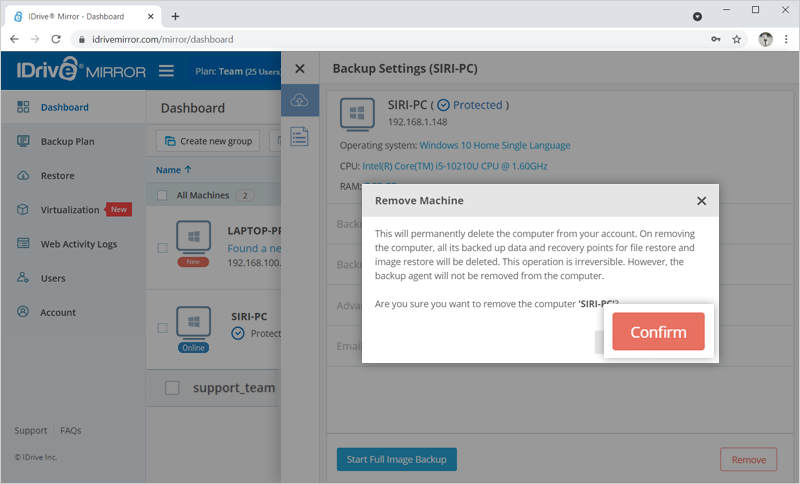
How do I remove or delete a computer from my Mirror account?You can permanently delete a computer configured to your IDrive® Mirror account. To remove a computer,
Note: Once you remove a computer, all its backed up data and recovery points for file and image restore will be deleted. |
Why does my backup summary show the backup size as the full disk size, for incremental backup?IDrive® Mirror uses the Changed Block Tracking (CBT) technology, for incremental backup in most cases. However in certain cases including (but not limited to) abrupt machine shutdown, change in the disk size, volume addition, reinstallation of backup application on the machine, etc., synthetic incremental backup is performed. In such cases, the amount of data changed from the last backup is calculated during the backup process. Hence the backup size displays the size of the entire disk selected for backup. However, the actual backup size will amount to only the modified portion. |
Does IDrive Mirror support the backup of BitLocker-enabled drives?Yes, IDrive Mirror supports the backup of BitLocker-enabled drives. The following is a guide on backup of BitLocker encrypted drives:
|
Is my backed up data safe with IDrive® Mirror?Mirror uses SSL protocols by default to secure all communications. It also employs industry-standard AES-256 encryption to securely transfer your data to the cloud and while at rest. |
Where does IDrive® Mirror store my data?IDrive® Mirror stores your data in world-class data centers featuring custom-designed raised floors, HVAC temperature control systems with separate cooling zones, seismically braced racks, and various physical security measures, to ensure its safety. |
My data is affected by ransomware. Can I recover my data using IDrive® Mirror?Mirror enables you to perform snapshot restore to a time prior to ransomware attack, thereby ensuring you can recover your valuable data. |
Does IDrive® Mirror store my data in compliance with regulatory norms?IDrive® Mirror assists you to comply with the mandatory regulatory norms pertaining to security and handling of electronically stored data. Your data in the cloud is readily available and Mirror employs encryption to store your data safely and prevent unauthorized access. |
Can I configure IDrive® Mirror to handle disk errors?Yes, by default IDrive® Mirror chooses to skip corrupted sectors on source disks during backup. Even if the volume with bad sectors is restored, these sectors will become empty sectors. You will not be able to read any files that were allocated in these sectors. You can modify this setting under individual computer 'Backup Settings' > 'Error Handling'. 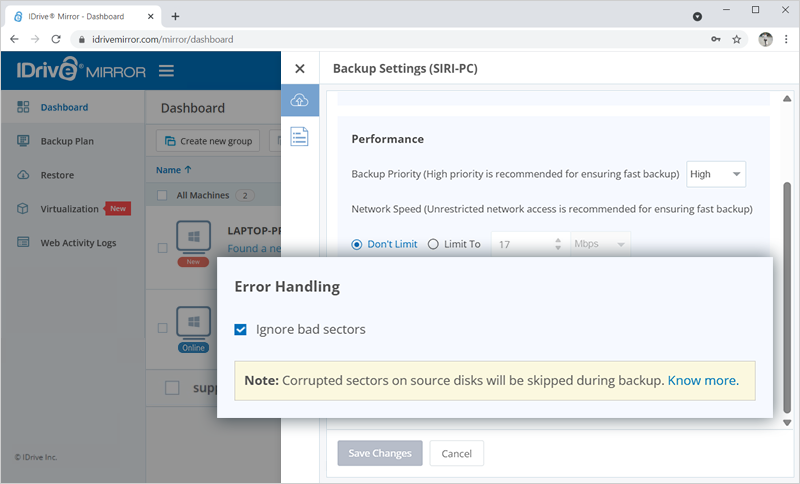 |
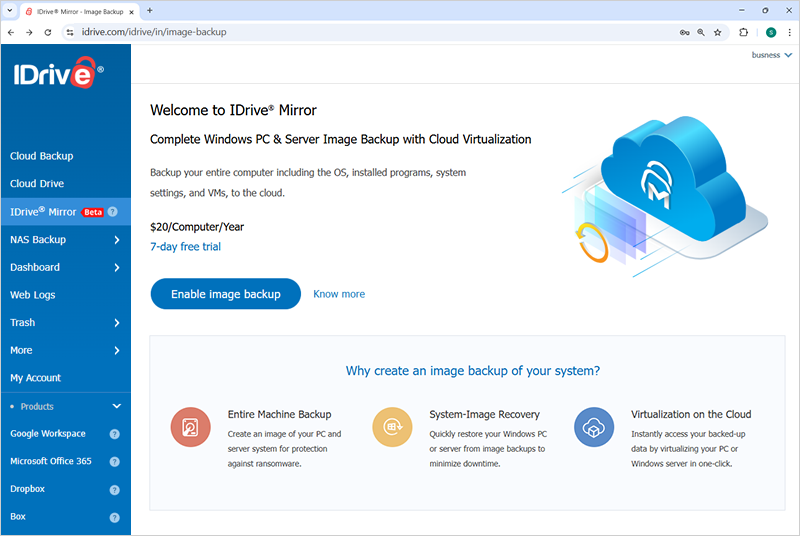
What is IDrive® Mirror and how does it work?IDrive Mirror is an advanced cloud backup and disk-image recovery solution for Windows computers and server systems. It allows direct data backup and retrieval from the secure IDrive cloud without any intermediary storage device. Data from multiple computers and servers can be saved to a single cloud account and accessed from anywhere via a web browser or the desktop application. The data stored is secured with AES 256-bit encryption. IDrive Mirror is available as an add-on with your IDrive subscription. To enable,
|
What are the system requirements for using IDrive® Mirror?IDrive® Mirror currently supports disk-image backup only for computers and server operating systems running on Windows OS. Following are the supported OS versions, filesystem, and disk partition styles: Operating System Versions
File System
Disk Partition Styles
Note: IDrive® Mirror installation is currently not supported on ARM devices. |
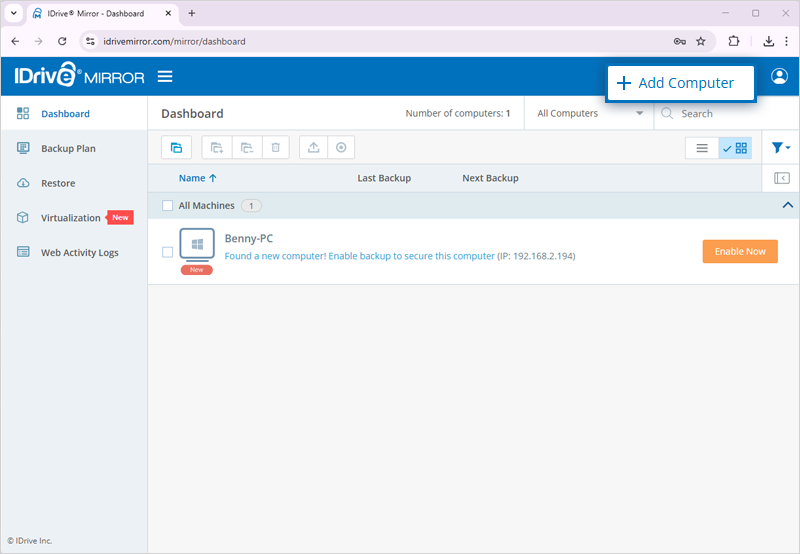
How do I get started with IDrive® Mirror?To get started, sign in to your IDrive account and navigate to 'IDrive Mirror' on the left menu and click 'Enable'.
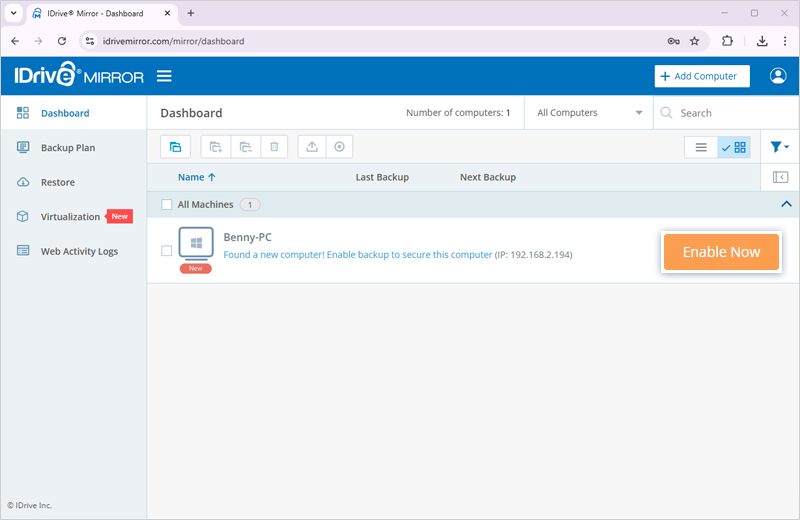
Once the Mirror centralized web console is launched, the IDrive Mirror backup application will automatically download on your computer. Install the application and enable backup for the configured computer. To enable backup for the computer via web,
You can also create a backup schedule, change the backup source, modify the email notifications, cleanup, and performance settings for the computer. |
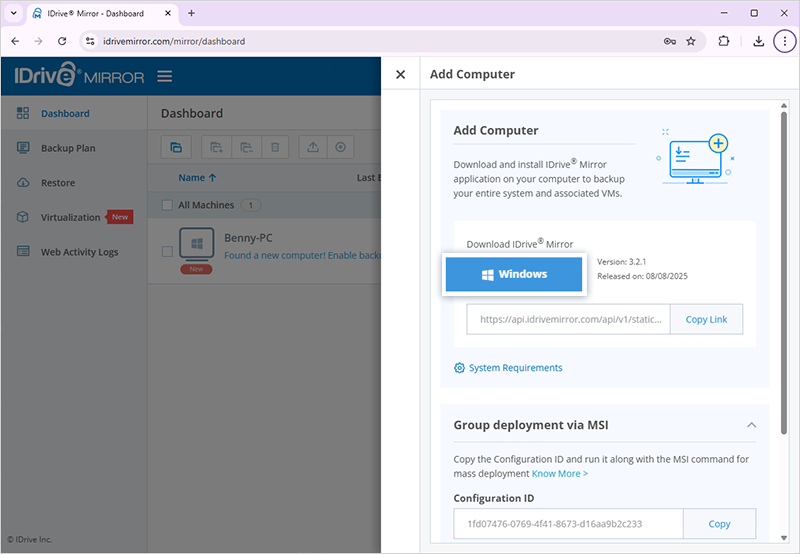
How do I add or configure a computer for image backup?You can configure more than one computer to your account. To add a new computer,
To start backup for the configured computer,
You can also create a backup schedule, change the backup source, modify the email notifications, cleanup, and performance settings for the computer. |
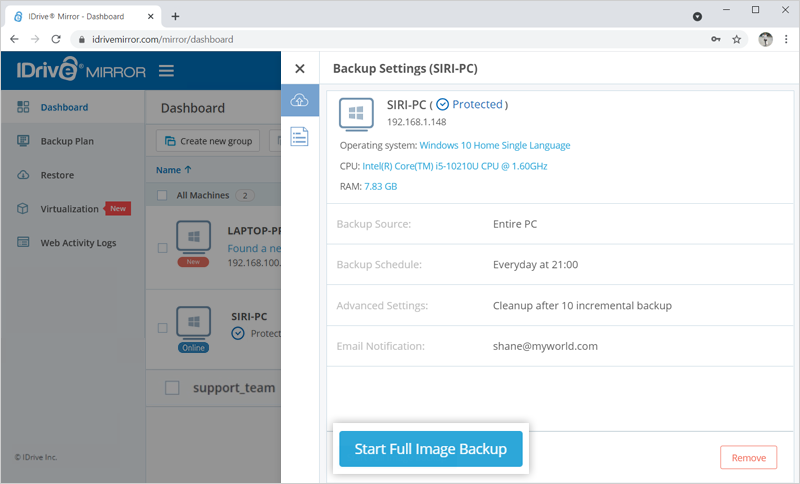
How do I perform an image backup of my computer?To backup your computer,
You can also schedule backup for your computer from the 'Backup Schedule' section in the slider window. Schedule backups daily or customize backups by selecting the required days and hours. You can even set an interval between consecutive backups. |
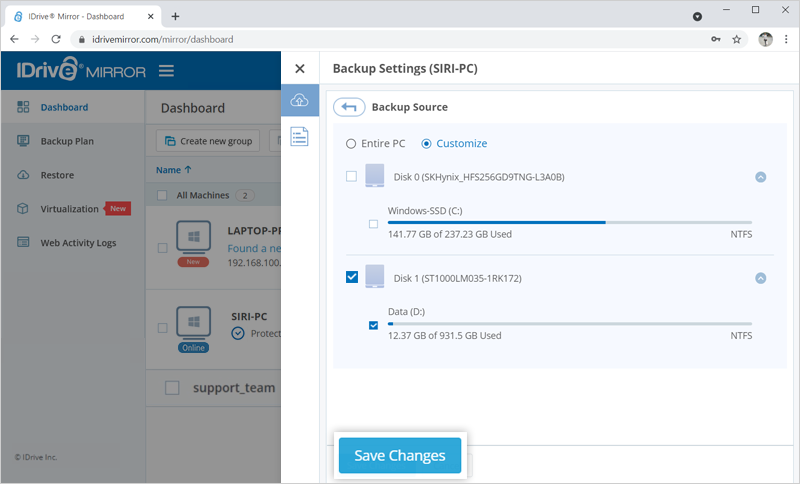
How do I backup an individual disk partition of my computer?By default, image backup selects your entire PC for backup to the cloud. However, you have the option to customize the backup source and upload data from specific drives of your computer. To backup a disk partition,
Note: If you deselect the drive where the operating system is installed, you will not be able to restore the entire computer. |
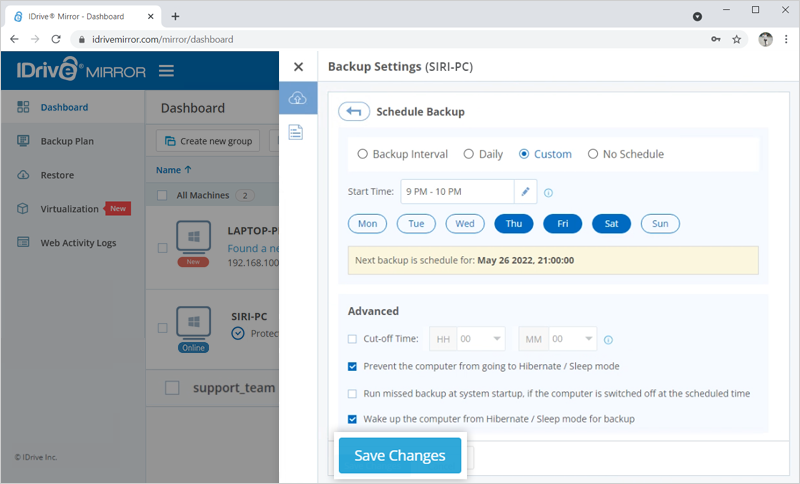
How do you schedule an image backup for your computer?To schedule image backups,
In the 'Advanced' section, set options to wake up your computer from hibernate/sleep mode for backup and run missed backup on system startup if the computer was turned off during backup. Backups will occur according to the saved schedule. |
Will the subsequent changes in my already backed up files be transferred incrementally?Yes, after the full initial image backup subsequent changes are backed up incrementally and synced with the existing data through scheduled data synchronization. |
Can I perform image backup for more than one computer?Yes, you can perform backup for multiple Windows computers directly to the cloud. You can see the list of configured computers in the 'Dashboard' tab. You can select individual or multiple computers at a time from the list for backup. |
How does image backup optimize data transfers?During image backup only the modified portions of your drives are transferred after full initial transfer by utilizing the Changed Block Tracking (CBT) technology. This optimizes your bandwidth usage, storage space, and ensures quick uploads. |
Is the backed up data reliable for restore?To ensure reliability of the backed up image data, IDrive® Mirror runs an immediate data integrity check after each volume is backed up. The data integrity check ensures that only the reliable copies of data are stored during backup and can be restored. |
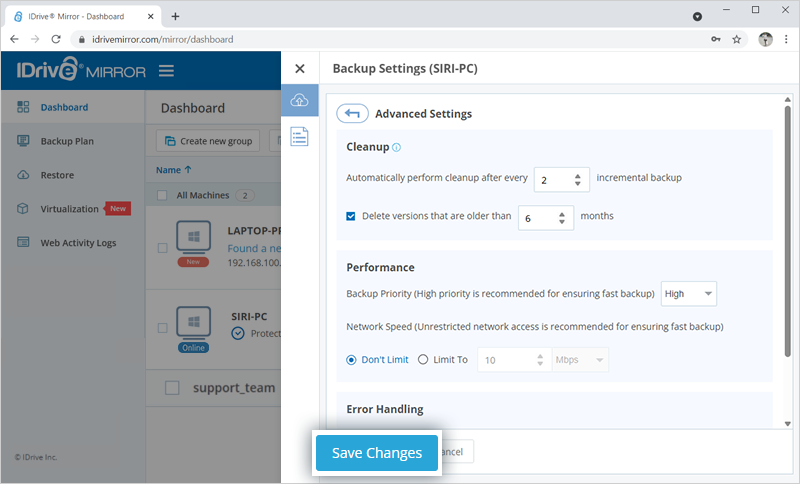
How long can I retain the backed up image data to my account?The data in your account is cleaned up periodically based on the Cleanup settings defined by you in the web console. To define Cleanup settings,
|
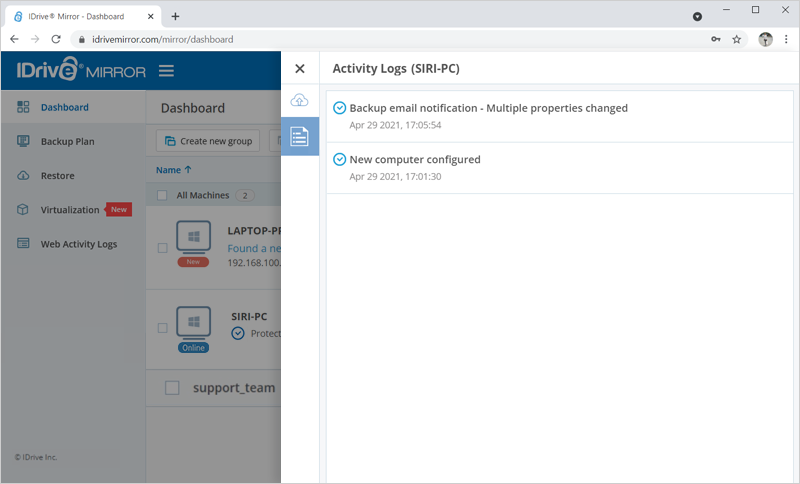
How do I view backup and restore activities logs for a computer?To view image backup and restore logs for a particular computer,
You can also view session logs of your activities during a login session by clicking the 'Notifications' icon on the top right corner of the Dashboard. |
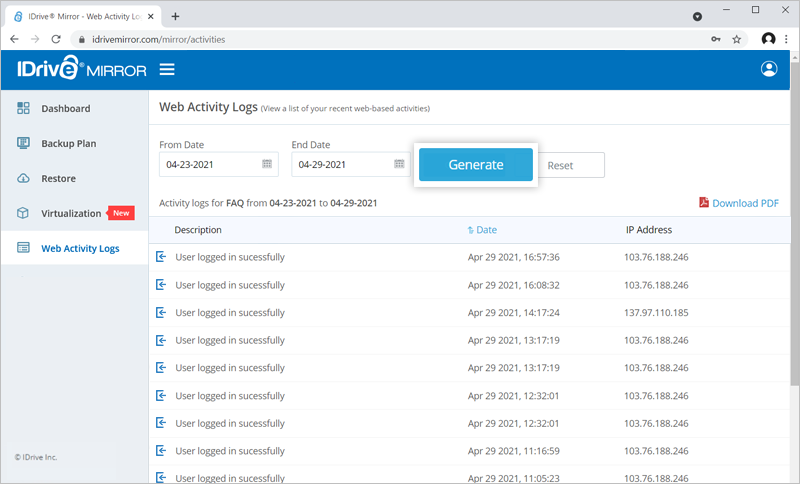
How do I view web activity logs specific to Image Backup?You can view a list of recent web activities for Image Backup from the 'Web Activity Logs' tab. Information such as the date, IP address of the computer, and a description of the activities for the selected period will be displayed on the screen. To generate logs for any period upto 90 days,
To download the logs in PDF format, select 'From Date', 'End Date' and click 'Download PDF'. |
Does IDrive® Mirror back up the entire disk, including empty sectors, or only the data in use?IDrive® Mirror backs up only the used sectors, skipping empty ones. This maximizes storage efficiency, optimizes bandwidth, and ensures faster uploads. |
Does IDrive® Mirror back up online-only files from cloud applications like Dropbox?No, IDrive Mirror only backs up offline files that are locally available on your computer. Online-only files, which are stored in the cloud and not physically present on the device, are not backed up with actual data. Instead, a placeholder (pseudo file) is created in the backup to indicate the file’s presence without containing its content. |
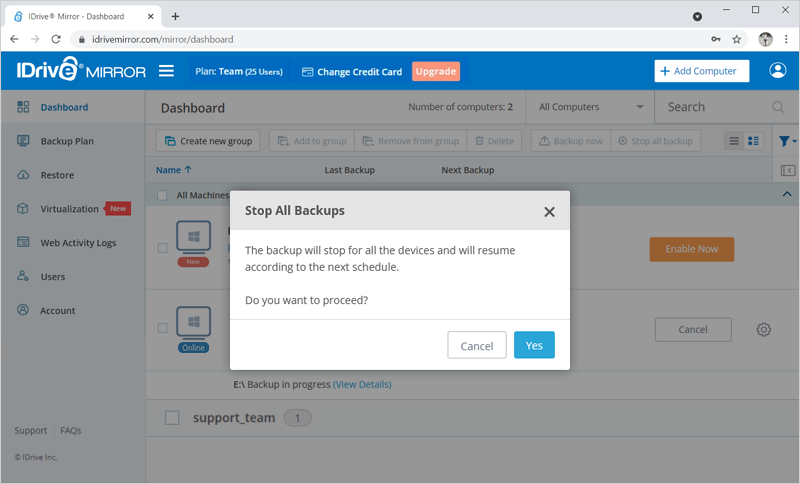
Can I stop ongoing backups of all my devices in one click?Yes, you can stop ongoing backups of all your devices, in one click. To stop ongoing backups,
Note: All ongoing backups will stop and will resume at the next schedule. This operation may take some time. |
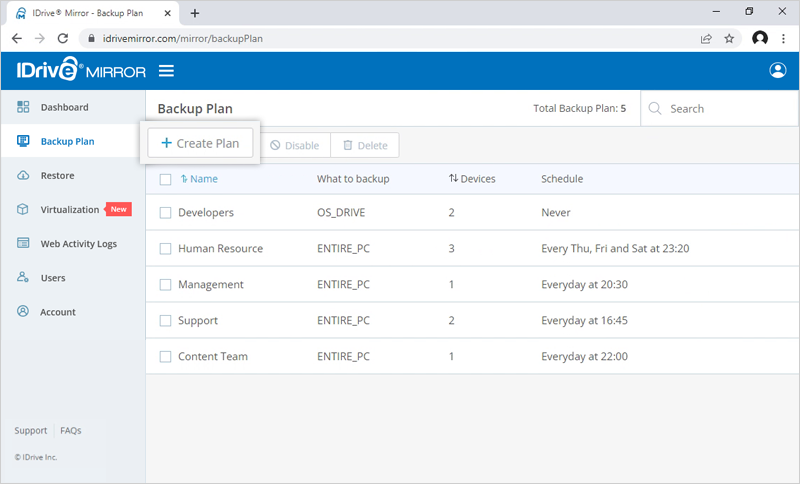
What is a backup plan?A backup plan consists of a group of settings that specify how the data will be protected on a particular computer. On creating your IDrive® Mirror account, a backup plan is created by default with predefined settings and applied to the added computers. The same can be viewed from the ‘Backup Plan’ tab. You can modify the backup settings, rename the plan name, disable the same, but you cannot delete the default backup plan. You can also create a backup plan with specific backup configurations and push it to selected computers in a go. To create a backup plan,
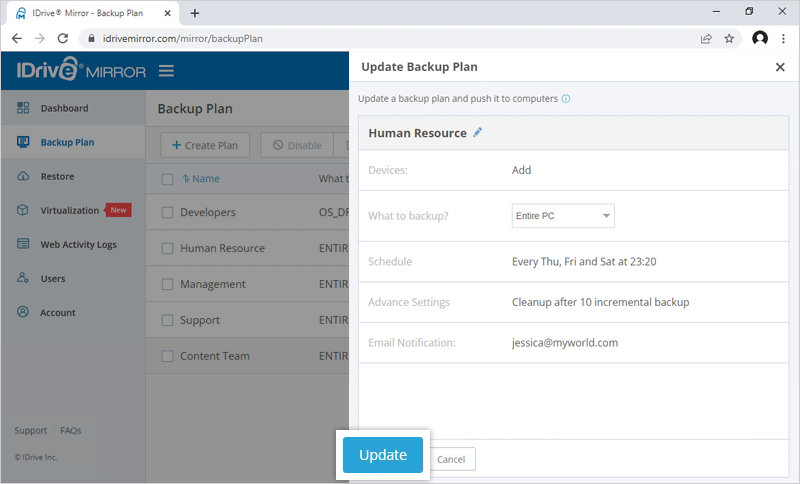
Devices: Select computers to be added from the list of devices. Click 'Done'. What to backup?: From the drop-down list choose ‘Entire PC’ or ‘Only OS Drive’ to backup. Schedule: You can set your backup schedule here and click 'Done'.  |
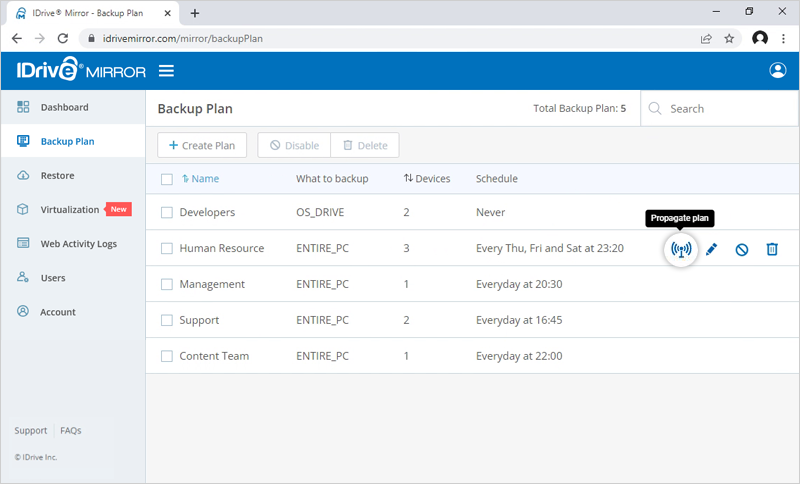
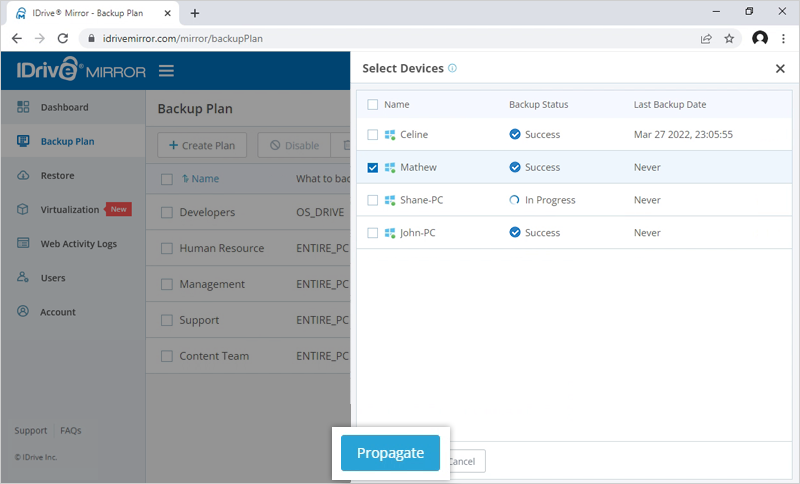
How do I propagate backup plans to my computers?To propagate a backup plan,
|
I have received a conflict alert while creating a backup plan. What should I do?A conflict may occur when you try to create a backup plan for a computer that is already part of another backup plan. In such cases, you can view the details of the conflict and choose to remove the existing backup plan for the computer and apply the new plan for the same. The already applied plans will then be disabled for the computers. |
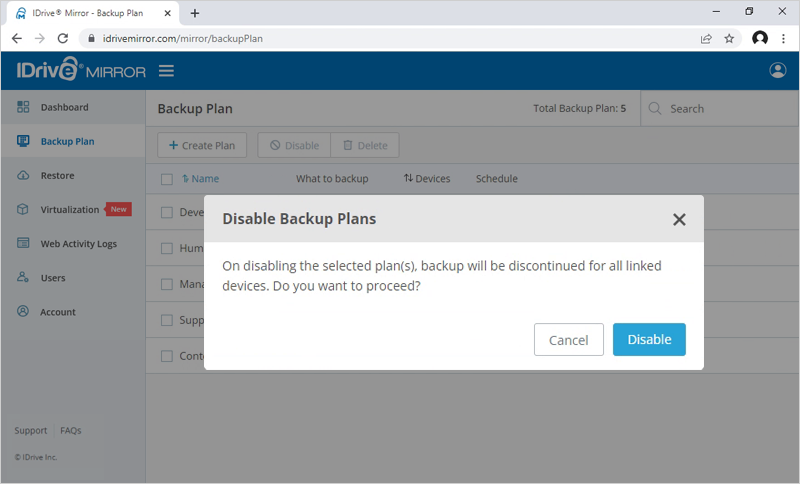
Can I disable the backup plan?Yes, you have the option to disable a backup plan. To disable,
To enable the same, select the backup plan and click the 'Enable' button. Click 'Yes' in the popup that appears. |
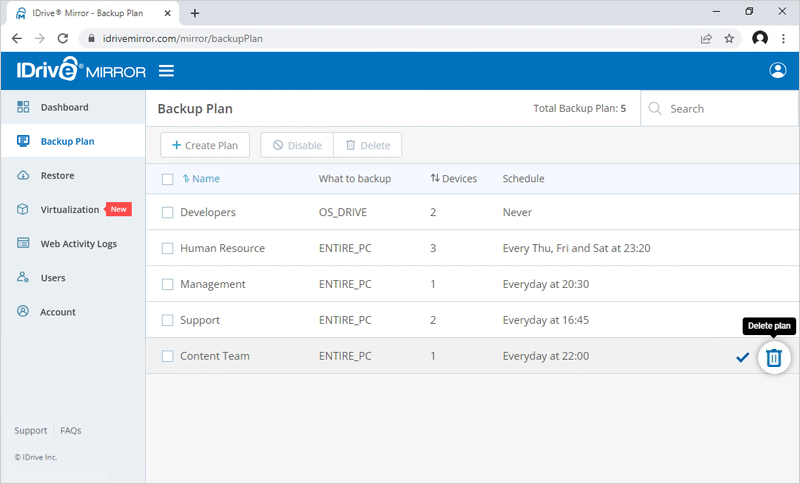
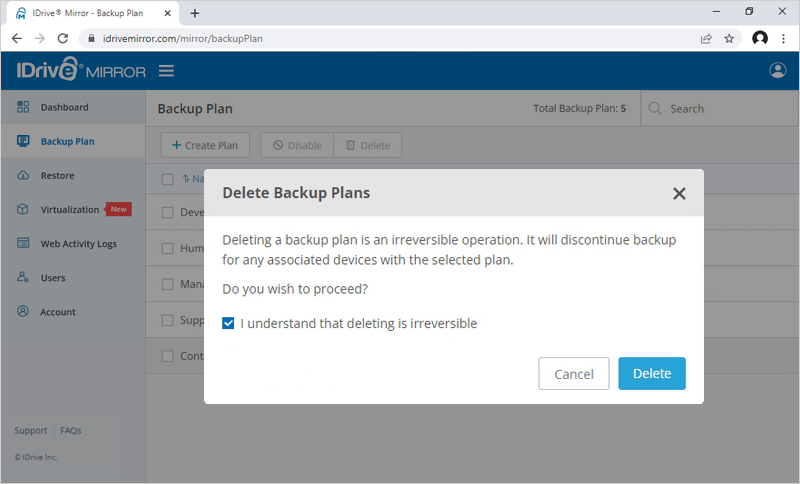
How can I delete a backup plan?To delete a backup plan,
On deleting a backup plan, all the backups with the configured settings will be discontinued for the associated computers. |
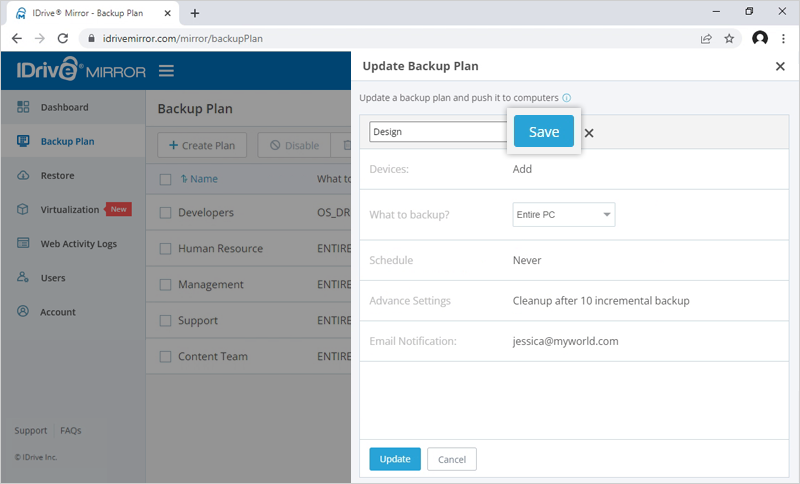
How do I modify an existing backup plan?To modify an existing backup plan,
|
What is a group?A group is a collection of selected computers. You can create any number of groups, and add computers to it. |
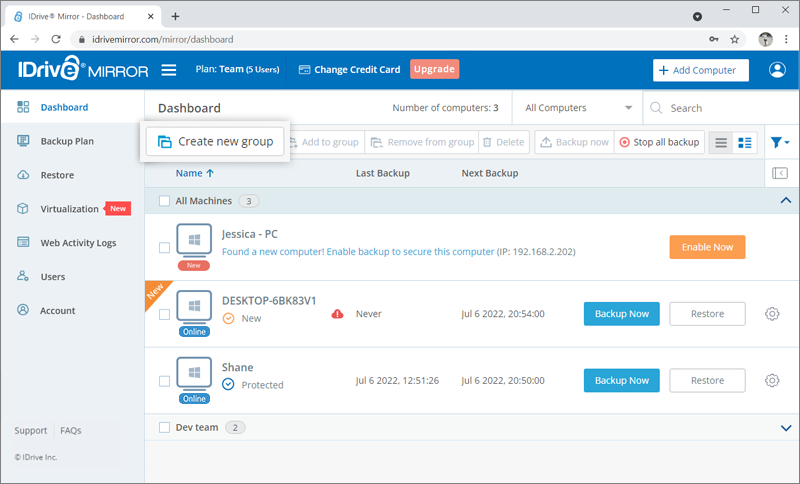
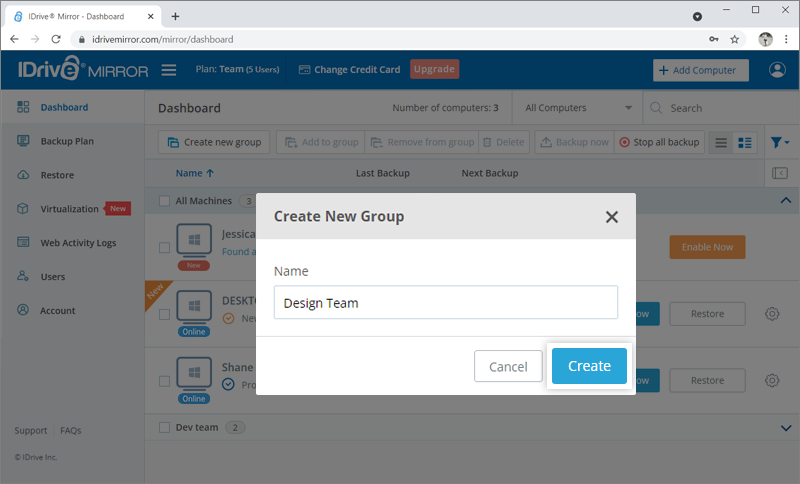
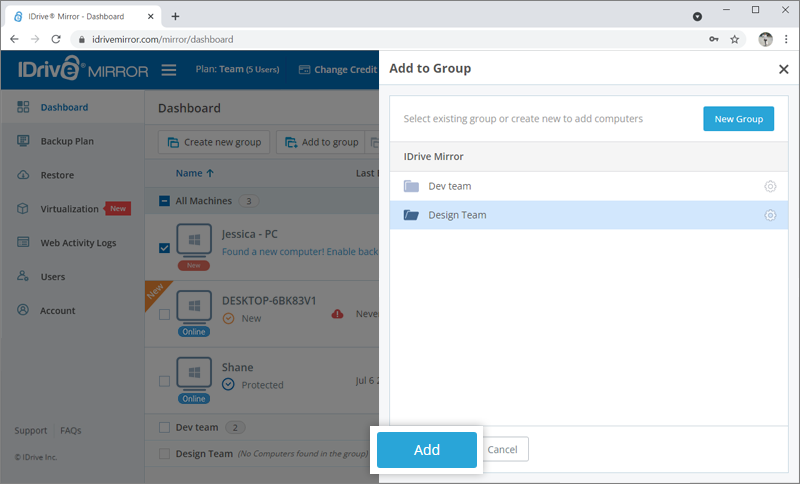
How can I create a group and add computers to it?To create a group,
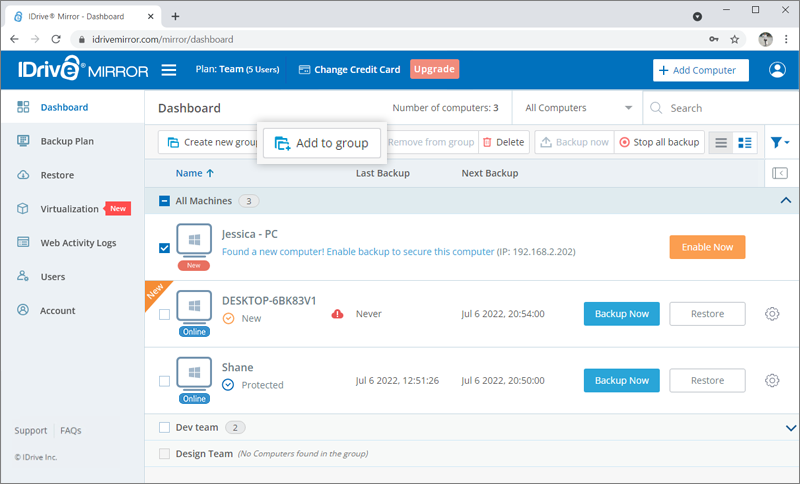
To add computers to a group,
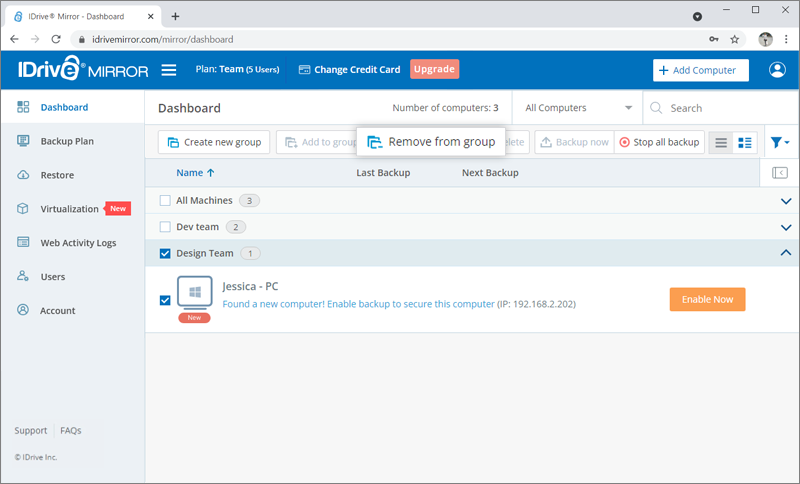
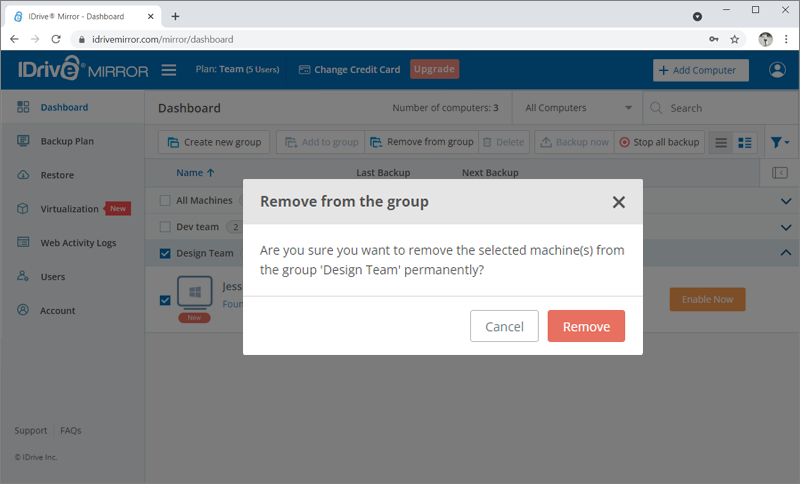
The computers will be added to the selected group. To remove computers from a group,
|
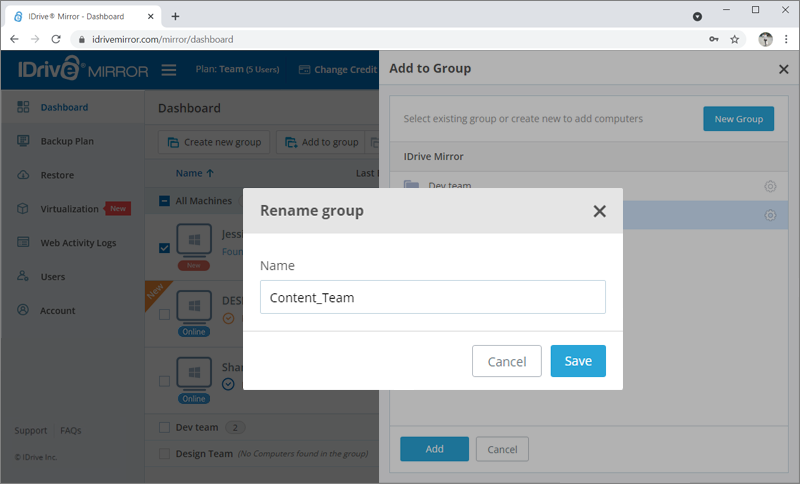
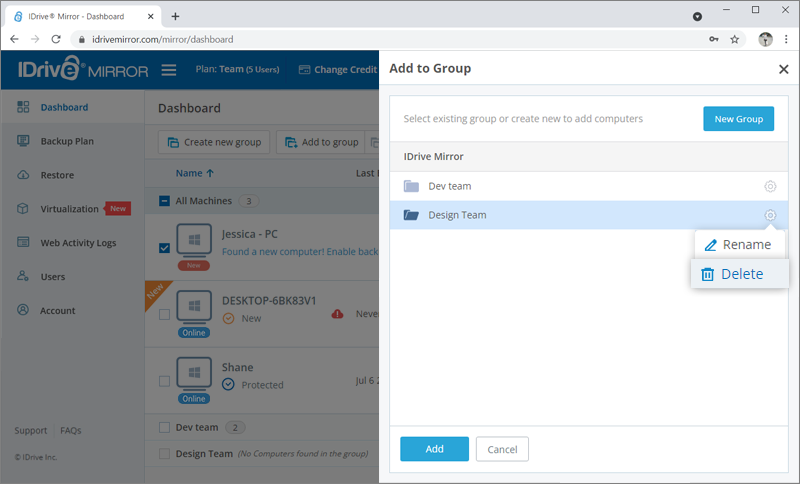
Can I rename and delete a group?Yes, you can rename as well as delete a group. To rename a group,
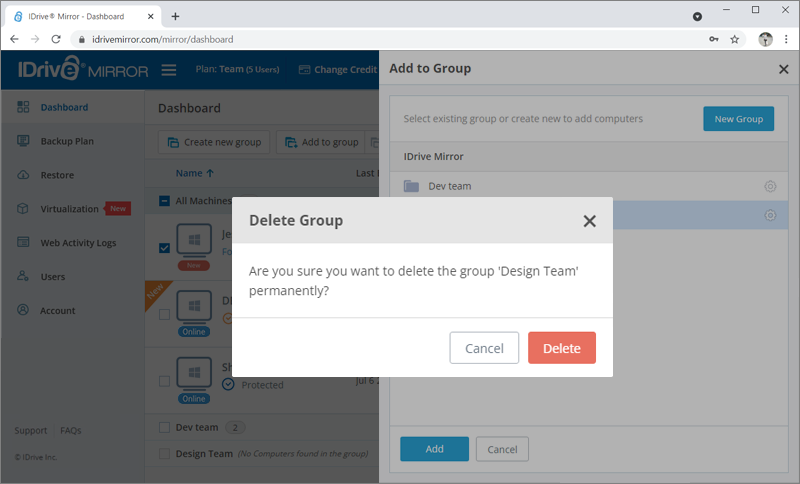
To delete a group,
|
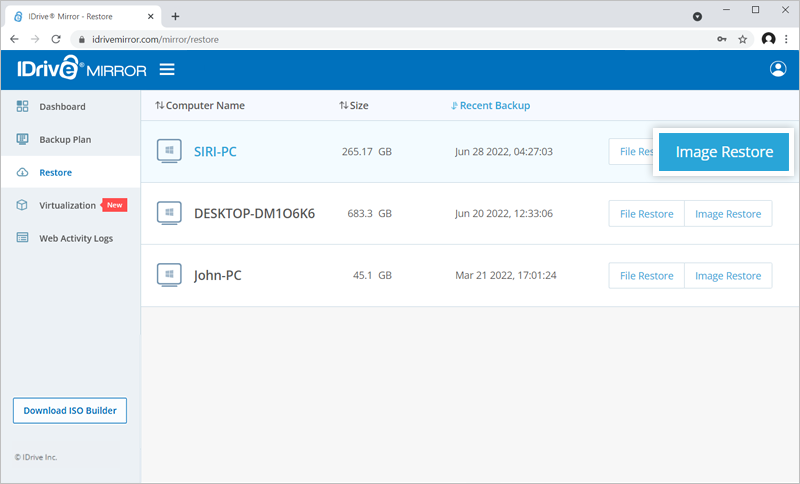
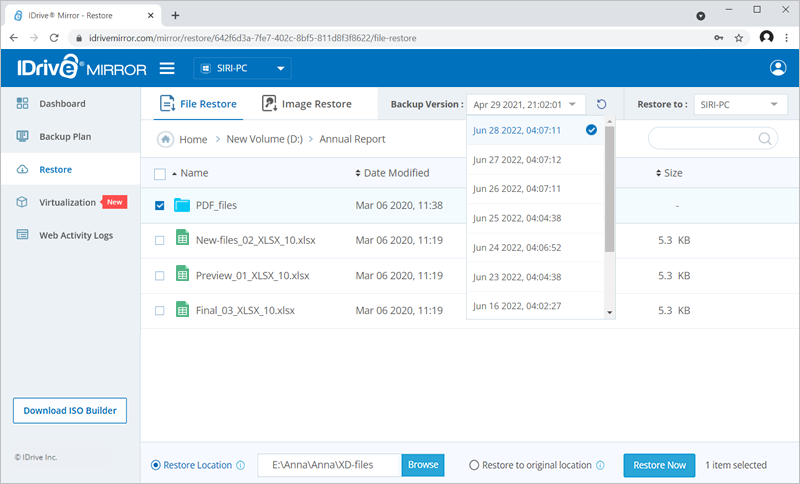
Can I perform a snapshot-based restore of my backed up data?Yes, you can perform a snapshot-based image restore for point-in-time recovery of your data backed up to the cloud. The historical backups function as recovery points and let you perform point-in-time data recovery. |
Can I perform full system-image recovery?Yes, you can perform a complete recovery of your Windows computer and server system from the image data, without the need of installing the operating system and other software. |
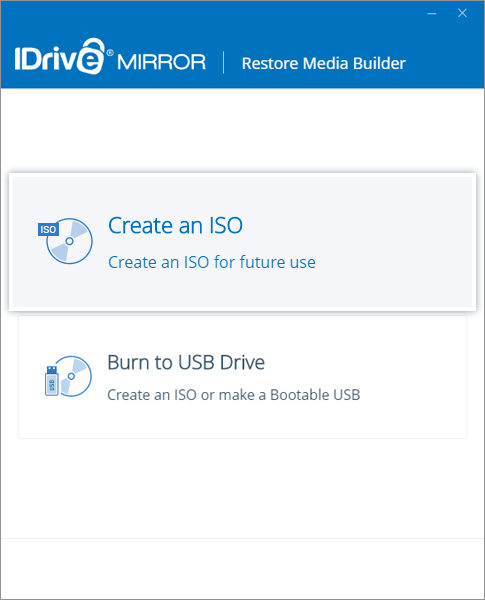
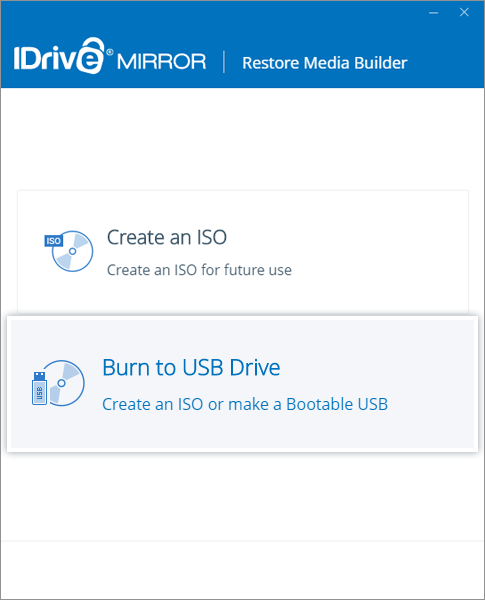
How to create a WinRE restore media for system-image restore?In order to initiate a WinRE-based system restore, you need to create a bootable USB or media device using the Restore Media Builder app. You can use this bootable WinRE-based recovery media to boot up a Windows computer on which restore needs to be initiated. To get started,
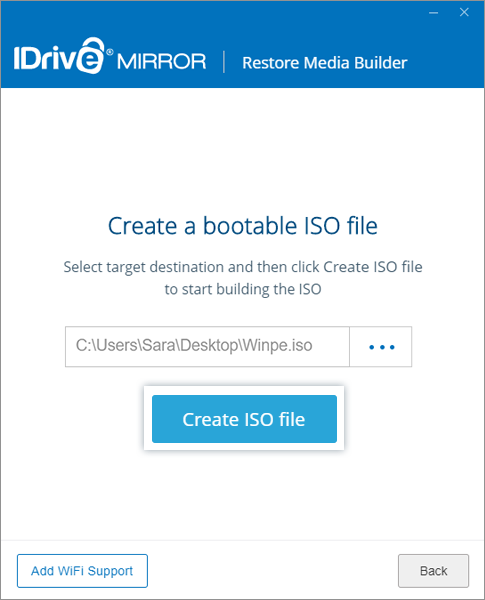
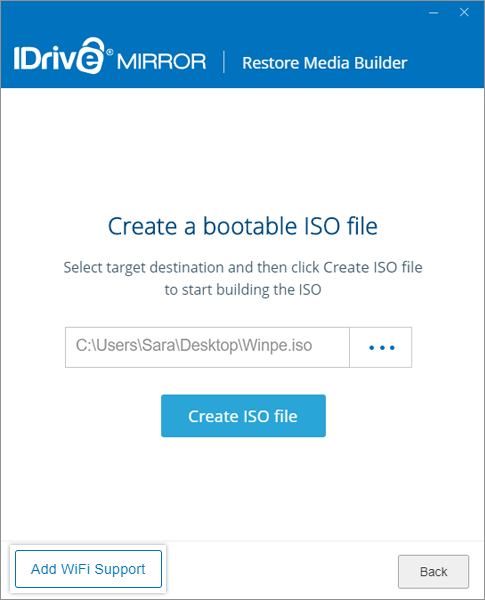
Once downloaded, install the Restore Media Builder app on your computer. To build a WinRE recovery media for future use,
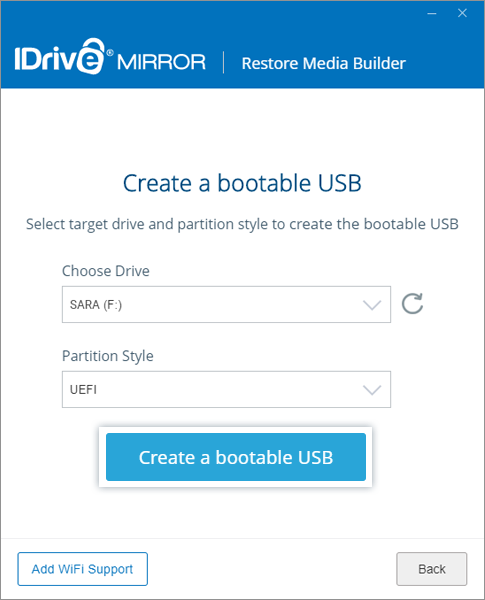
The ISO build progress will be displayed on the page. You will receive a success message once the rescue media is created. 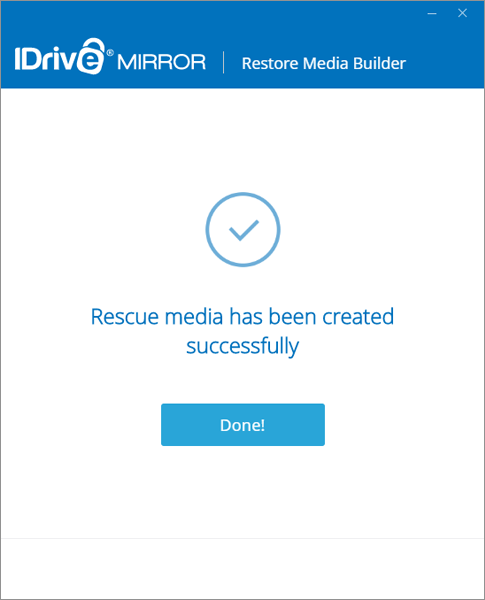 To build a WinRE recovery media for immediate use,
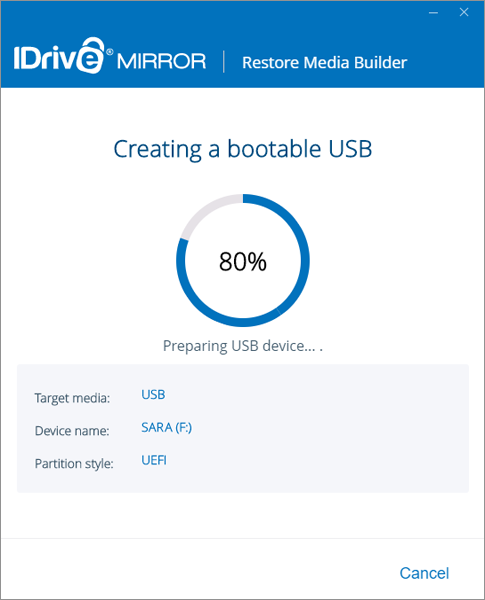
The bootable USB creation progress will be displayed on screen. You will be notified once the bootable USB device is successfully created along with further instruction to use the bootable device. Note: If the setup is not able to find the .wim file, you will be prompted to download Windows ADK to complete building the ISO. |
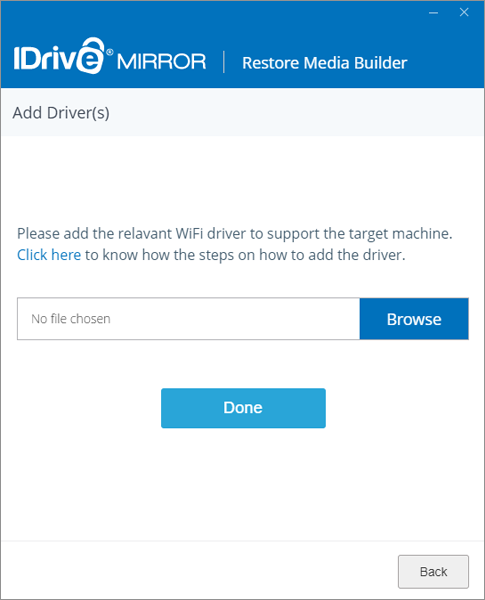
How do I build a bootable WinRE media that includes wireless WiFi support?The Restore Media Builder app enables you to create a WinRE media with support for wireless networks. This means you can easily connect to a wireless network via WinRE. To add WiFi support to a bootable WinRE media,
Once the driver is added, a list of all the available WiFi networks around will appear in the WinRE Restore application. 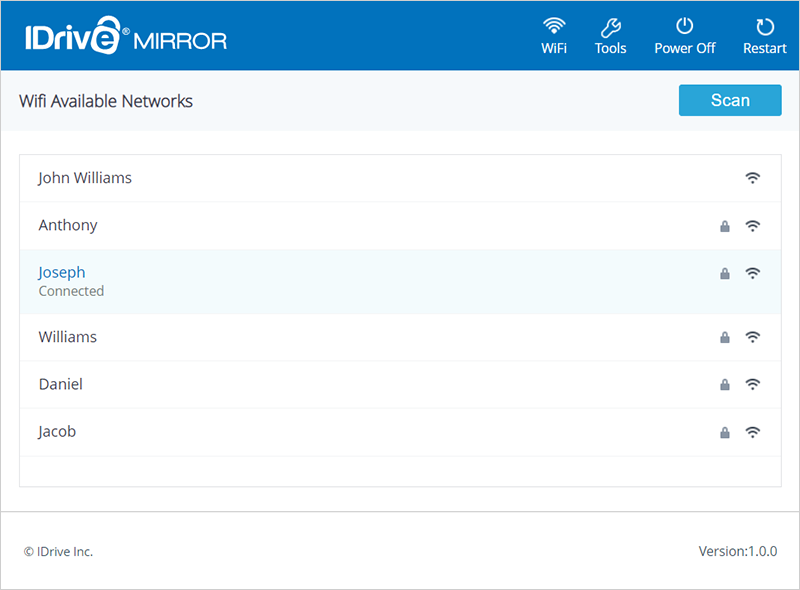 Next, follow the steps given in the above FAQ for building a WinRE-based recovery media for future and immediate use. |
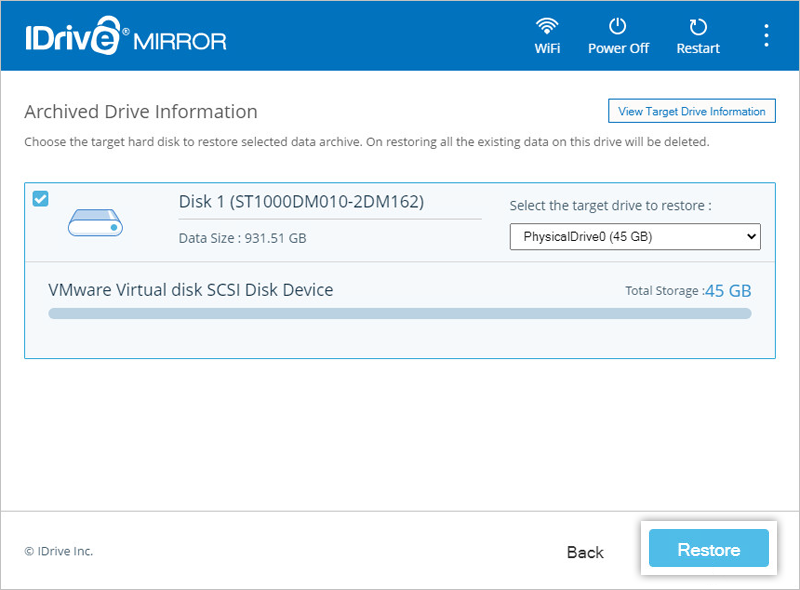
My Windows computer has crashed. Can I restore it using image backup?Yes, you can restore your configured Windows computer from the image backups stored in your account without downtime during data loss or data corruption. The following prerequisites must be fulfilled to restore data using a WinRE recovery media:
To restore data using WinRE bootable USB drive,
The restore progress will be displayed and you will receive a message once the restore is complete. To restore data using WinRE bootable ISO file, attach the ISO file to a virtual machine, and launch the WinRE Restore setup. Then follow the remaining steps for USB data restore. |
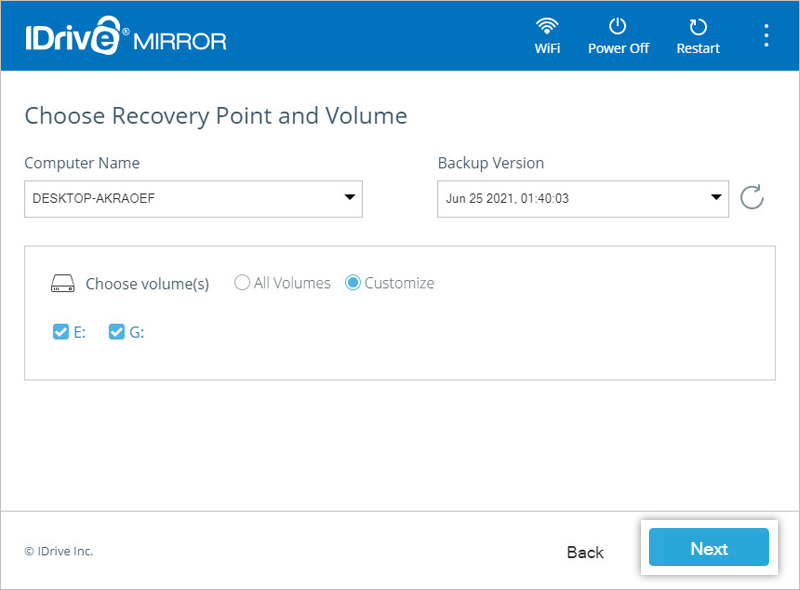
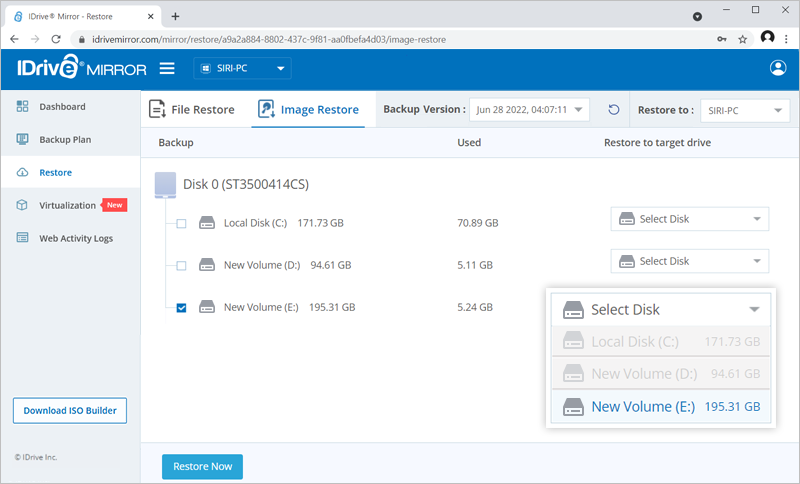
Is it possible to restore specific disk volumes?Yes, you can easily restore specific disk volumes. To perform a volume-level restore,
Note: Volume restore cannot be performed on the location where the operating system is installed on the computer. |
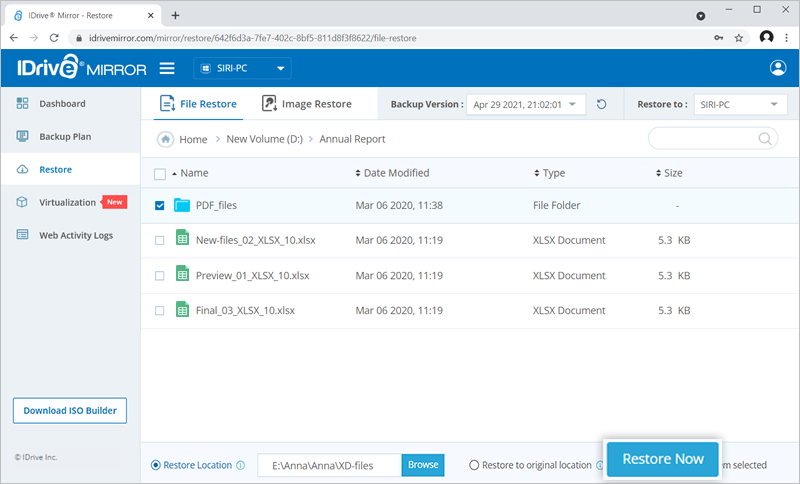
Is it possible to restore individual files and folders?Yes, you can easily restore an individual file or folder. To perform a file/folder-level restore,
|
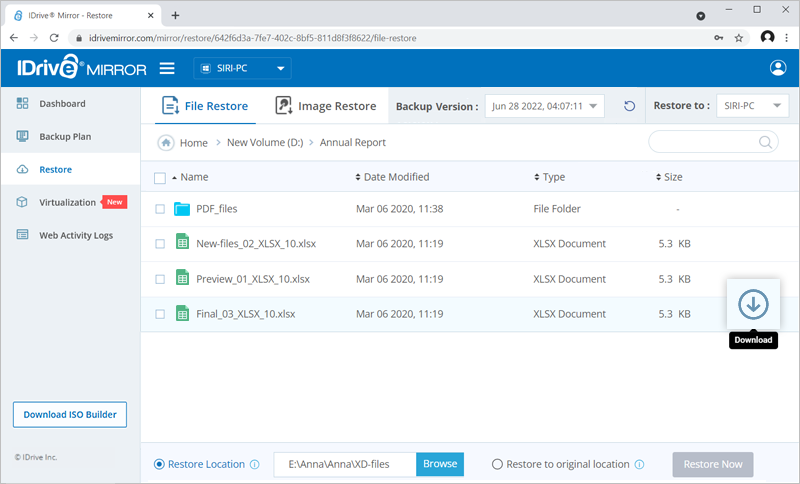
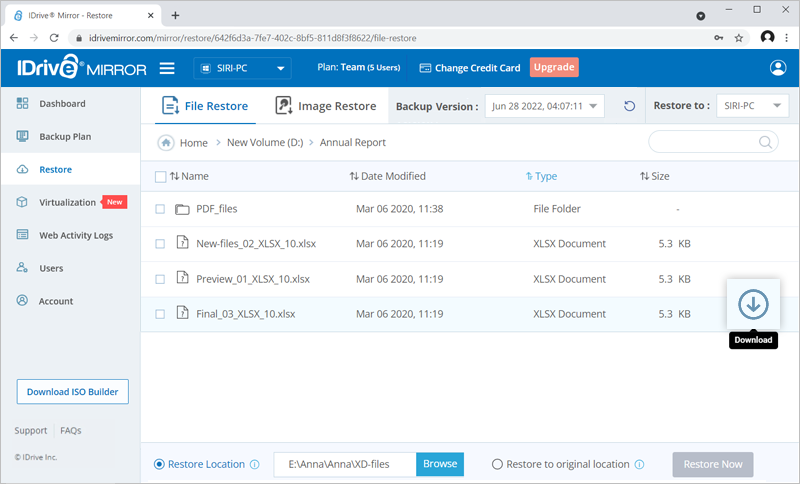
Can I restore one computer's data to another computer?No, you can perform restore at original location and custom location only on the same computer from where the data was backed up. However, you can download required files to another computer. To download a file,
Note: You can only download one file on your system at a time. |
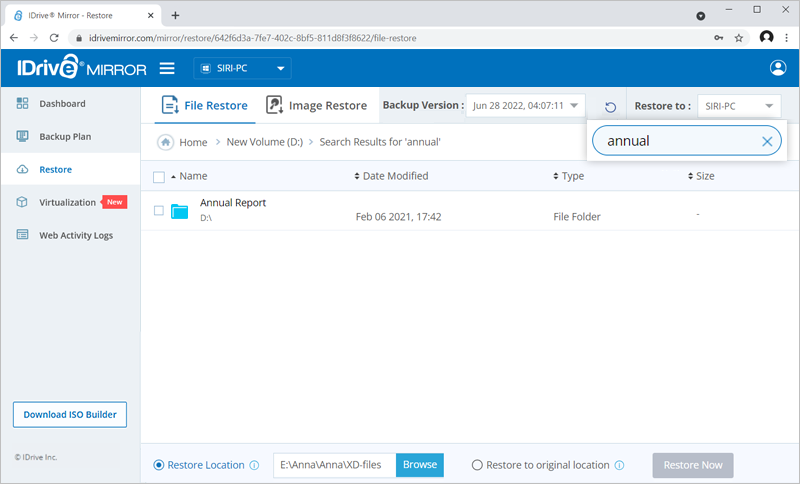
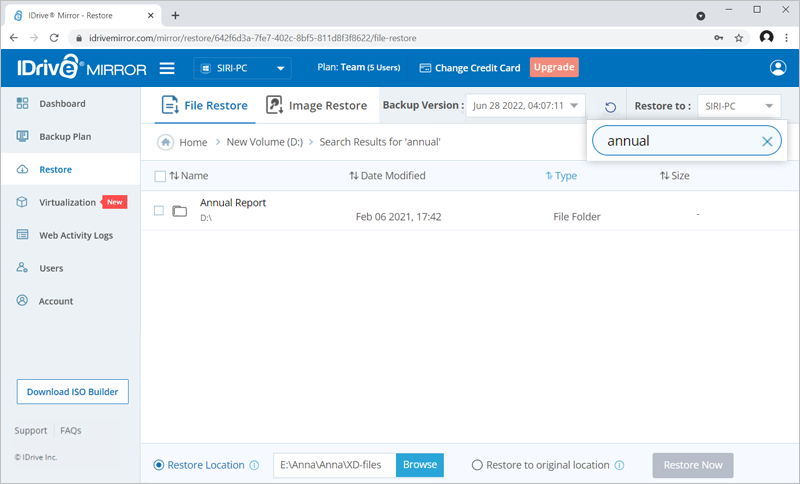
Can I search a particular file from my account?Yes, you can search specific files from your account. To search and restore files,
|
Which file systems are supported by IDrive Mirror for volume restore?IDrive Mirror supports image restore only for NTFS-formatted source volumes. However, the volume image can be restored to a target volume formatted with NTFS, FAT, FAT32, or exFAT. Important: Restored volumes that are converted to NTFS from FAT, FAT32, or exFAT will not be automatically added to your backup source list. To include them in future backups, you must add them to the list manually. |
Why is 'Restore to Original Location' disabled when restoring certain files or folders?The ‘Restore to Original Location’ checkbox is automatically disabled if you select any system or application-related folders during file restore. This is to prevent overwriting critical operating system components, maintain system stability, and avoid boot issues. The option will be disabled if you select any of the following folders: C:\$RECYCLE.BIN If even one of the above folders is selected alongside other folders from any volume, the ‘Restore to Original Location’ option will be disabled for the entire selection. To enable the option, remove all restricted items from your selection. Once no system folders are selected, the ‘Restore to Original Location’ checkbox will become available. |
Can I restore one computer's data to another computer?No, you can perform restore at original location and custom location only on the same computer from where the data was backed up. However, you can download required files to another computer. To download a file,
Note: You can only download one file on your system at a time. |
Can I search a particular file from my IDrive® Mirror account?Yes, you can search specific files from your IDrive® Mirror account. To search and restore files,
|
Can I use the ISO build created using IDrive® Mirror for multiple computers, at any location?Yes, the ISO build created on one computer using IDrive® Mirror can be used in any other computer without any issues. |
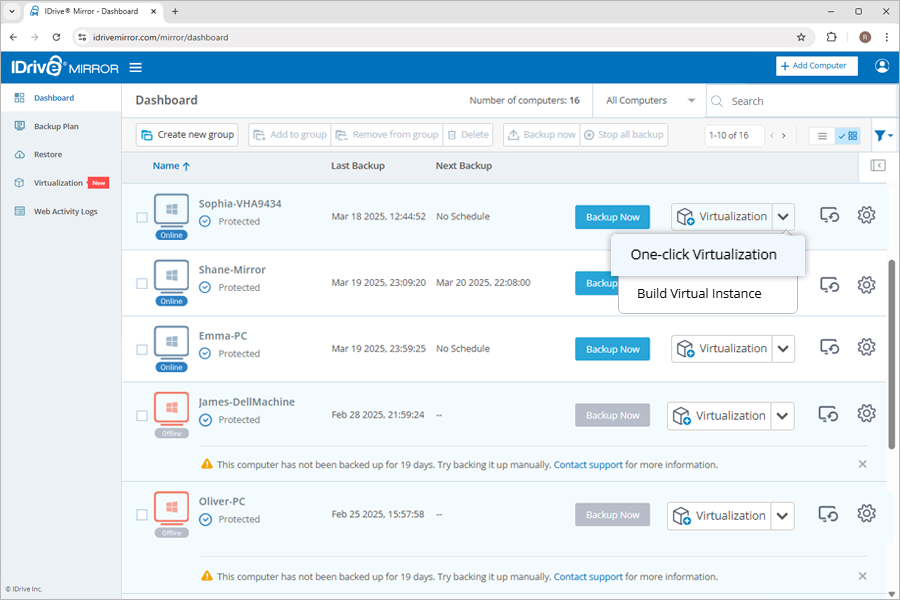
What is one-click virtualization in IDrive® Mirror?One-click virtualization in IDrive Mirror enables you to quickly set up a virtual instance of your computers on the cloud. This one-click process enables you to instantly create a virtual instance using default configurations and the latest backed up data of the computer you want to virtualize. |
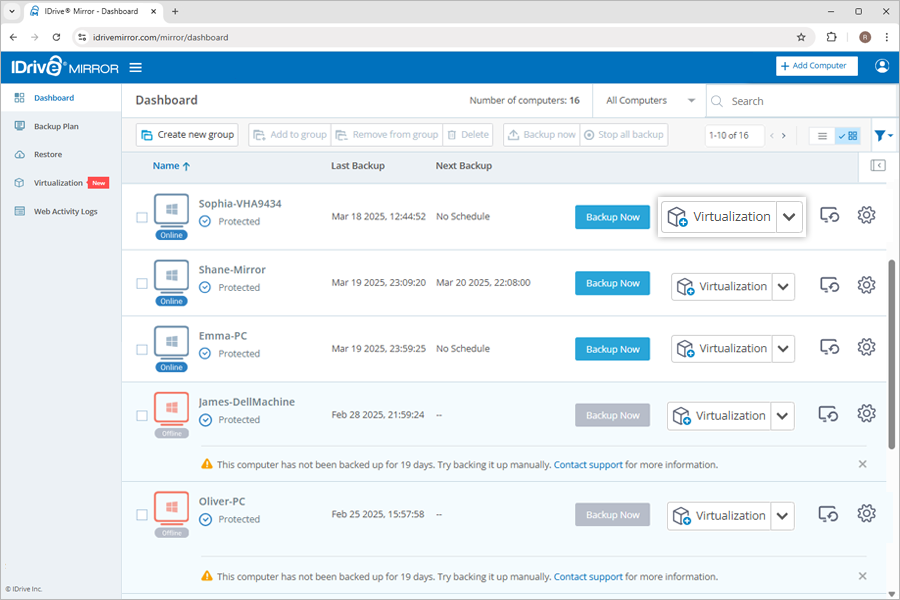
How do I perform one-click virtualization of my computers?To create a virtual instance with a click,
The virtual instance will be instantly created using the last backup of the selected computer. By default, it will be allocated with 2 GB RAM and 2 processors. To access the virtual instance in the future, click Connect Now. 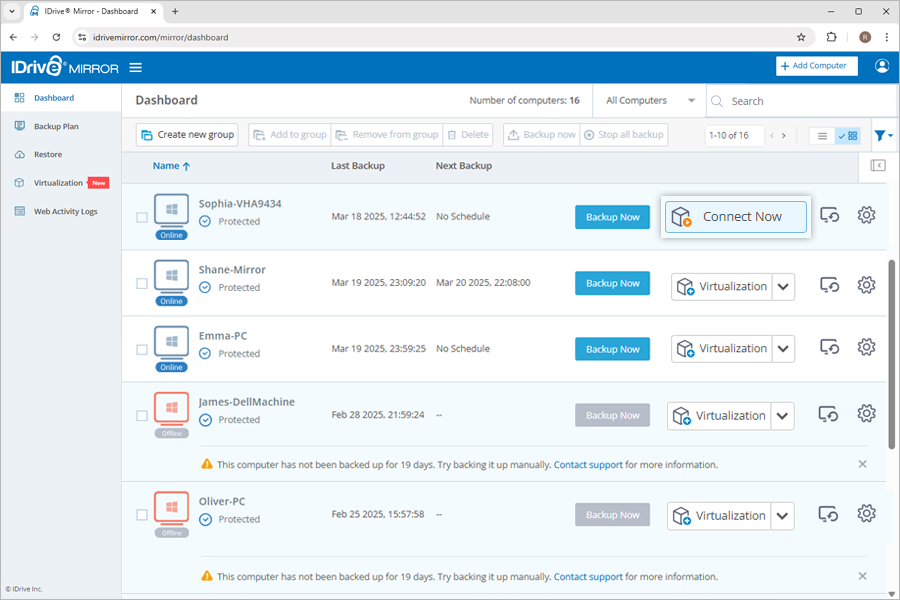 |
How quickly can I virtualize a machine with IDrive® Mirror?IDrive Mirror uses the KVM hypervisor for better virtualization and high performance. It allows you to instantly virtualize a machine. |
How many virtual machines can I create?With IDrive Mirror, you can create up to four cloud virtual instances. Each instance is created from a separate data backup, and only one instance can be created per computer. You can allocate up to 16 GB cumulatively for the RAM configuration of the four virtual instances. This solution is optimized to use minimal memory and CPU resources, allowing multiple virtual machines to operate efficiently. |
What are the points that have to be taken into consideration while virtualizing a machine?The following points must be taken into consideration while virtualizing a machine.
|
If I virtualize a machine, will the original backup be affected?No, virtualizing a machine does not impact its backed-up data. IDrive Mirror's file system allows for instant cloning of the original backup. Since the virtual machine is created using the cloned data, the original backup remains unaffected. |
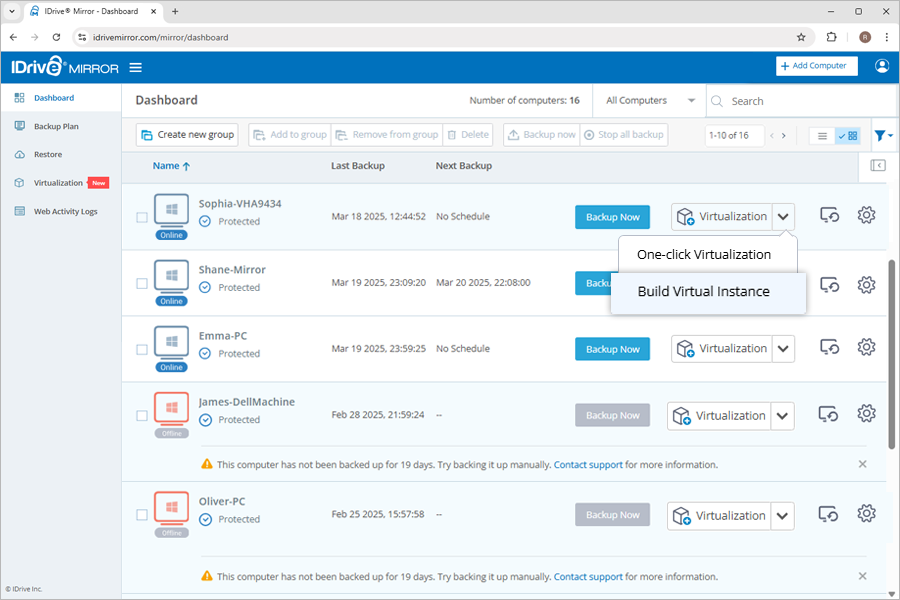
How do I build a custom virtual instance of my computers?To create a custom virtual instance of your computer,
Note: When a machine with dynamic disks is virtualized, the created virtual instance will have basic disks with randomly assigned drive letters. You may have to sign in to the VM and change the drive letter associations as necessary. |
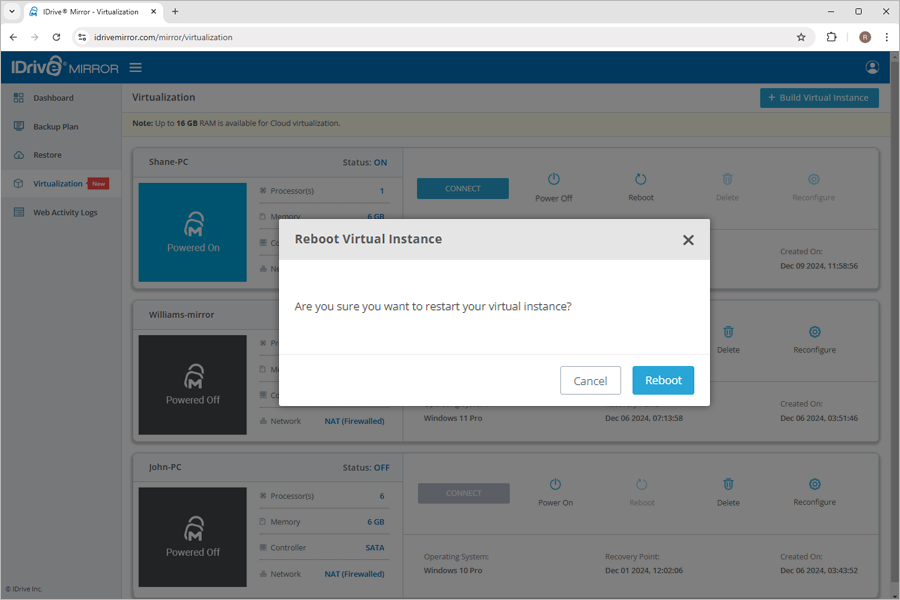
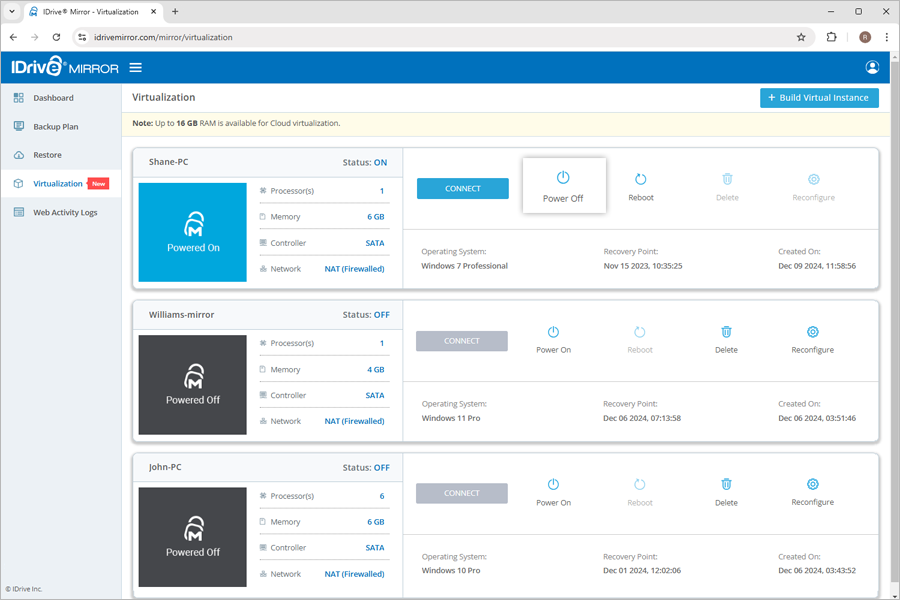
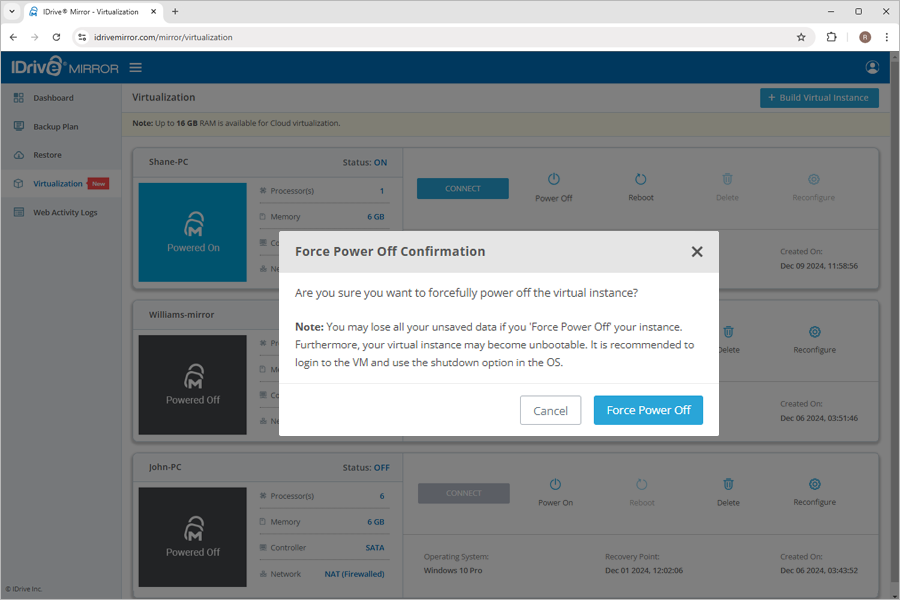
Can I perform power operations on the virtual machine?Yes, you can perform power operations on the virtual machine. To perform power operations,
To restart a virtual machine,
|
What are the network source options available for creating virtual instances?Configure the connection of the new virtual instance to other devices and locations on the network by selecting a suitable network source. The network source options available for creating a virtual instance are: Disconnected NAT (Firewalled) |
Why am I being prompted to activate my Windows license for the new virtual instance?Windows licensing links your purchased product key to the hardware configuration of the machine. In the case of a virtualized machine, the hardware for the virtualized machine is provided by the hypervisor which is different from the physical hardware and this may prompt Windows to re-activate your license. The solution depends on the type of your Windows license. Solution for retail license: Windows allows retail licenses to be transferred to another machine. You can simply enter the product key on the new machine and reactivate the Windows license. Note: Retail licenses can only be installed on one machine at any particular time. Avoid activating Windows on multiple computers with the same product key. Solution for OEM license: OEM license is non-transferrable and links your purchased product key to the motherboard of the original physical computer. To secure license activation for a restored machine, you will need to contact your OEM-license provider. IDrive Mirror cannot assist you with third-party licensing issues. |
How do I access resources within my site's network from a virtual instance on the IDrive cloud?The virtual instances on IDrive Mirror will have outbound internet network connectivity. You can use a suitable VPN solution within your site's network and configure the VPN client on the virtual instance to bring it inside your network. We recommend using either of the two methods detailed below. Method 1: Use a self-hosted OpenVPN access server Prerequisite: The OpenVPN Access Server is available as a virtual appliance and as a software package. The software package needs a spare Linux machine (Ubuntu 18) for manual deployment. We recommend using a pre-built virtual appliance instead which is quick and easy. The download for the virtual appliance method is available for both Hyper-V and VMware ESXi platforms in which you can choose the feasible one. The following steps assume you have a Hyper-V server where you can self-host the OpenVPN access servers' virtual appliance, by downloading the required virtual disk file and attaching it to a Generation 1 VM. Download the virtual appliance
Note: This free version of OpenVPN allows 2 licenses. You can connect only 2 cloud virtual machines via VPN at a time. Set up port forwarding in your router to enable access to the OpenVPN access from the cloud VM
Once the port forwarding is set up, your OpenVPN access server's web UI is accessible from anywhere for administration via the WAN/Public IP: Steps on Mirror VM
Your cloud VM now has access to your site's internal network resources through this VPN channel. Method 2: Use your existing VPN solution This method is suitable if you already have a hardware or software-based VPN solution setup within your network (router, switch, Cloud VPN software product, etc.). You can configure the cloud virtual instance to connect to your existing VPN infrastructure and get access to its local network resources. |
My computer is failing to virtualize. How can I recover my data?Virtualization may fail due to various reasons, including disk configuration issues, driver incompatibility with IDrive Mirror's hypervisor platform, firmware type, or multiple OS boot loaders. If your computer fails to virtualize, contact IDrive Mirror support as the first step. This will allow us to diagnose the issue and provide a resolution based on your specific case. In the meantime, you can recover your data using the following methods: |
Can I perform backups and restores in a virtual instance created from a recovery point?Currently, IDrive Mirror does not support additional backups or restores within a virtual instance created from a recovery point. This functionality will be available in future releases. |
Why am I seeing the "A driver cannot load on this device" error in my Windows 11 VM, and how do I fix it?During Cloud Virtualization on Windows 11 systems, some virtual machines (VMs) may show the error: "A driver cannot load on this device – Driver: E1G6032E.sys" When this happens, the Intel network driver is blocked from loading, and network connectivity will be disabled inside the VM. 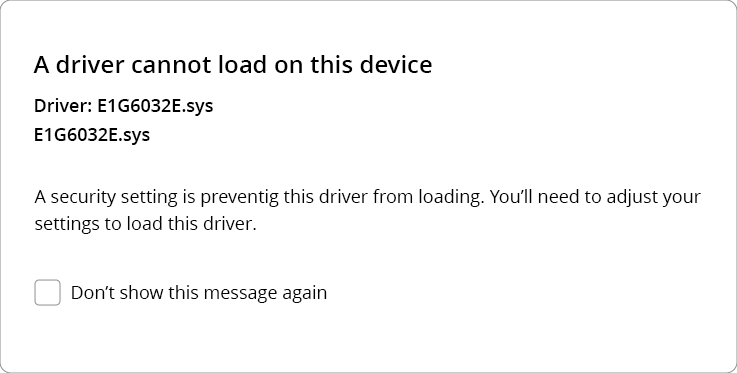 This issue occurs because Windows 11 Core Isolation (Memory integrity) security setting is preventing the Intel driver from loading. To resolve the issue, perform the following steps inside the affected VM:
After restarting, the Intel driver will load successfully, and the VM will regain network connectivity. Note: Memory integrity is a Windows security feature that helps guard against malicious attacks. Disabling it resolves the driver issue but may reduce system security. Evaluate your security requirements before keeping it OFF. |

 and the 'Rename Backup Plan' popup appears. Enter the desired name and click 'Save'.
 .
.

 .
. .
.

 to forcefully power off the machine. You will be prompted with a confirmation window.
 next to the corresponding machine.